Hi there all. My project is sold to an awesome lady who's gonna rock it out. I'm stoked for her! Sad to say goodbye, but c'est la vie :-)
On goes the adventure.
Hopefully she'll start her own blog and I can link to it...
.....
And she did! here it is: https://smallspacemoreplace.wordpress.com/
happy house building!
Saturday, August 29, 2015
Tuesday, June 30, 2015
For Sale!!
Due to a big (and nice) change in life direction, my tiny house building project is regretfully cancelled. I'm planning to sell my trailer and collected materials. It's a great starter package, will save on time spent collecting materials and prepping the house foundation. Here are the details:
- the trailer was custom built for my project by The Trailerman in Abbotsford. Very solid steel trailer, 22' long 8'4" wide platform, double drop axle to allow for more height inside the tiny house, rated to 10 000 lbs gross vehicle weight, with welded-on attachment points for house framing. Lights, electric brakes. This is a strong tiny house foundation! Not designed to be used as an RV, but for very occasional moves.
- I attached sheet aluminum flashing to the bottom of the trailer to protect from rodents, insects and road grime, as well as to keep insulation under the floor contained and protected. The flashing is well caulked at the seams with butyl caulking, and screwed to the underside of the trailer at many points.
- I also bolted/screwed 2x5 boards to the trailer cross members as attachment points for the floor decking.
- I have carefully installed floor insulation in the trailer cavity, depth of 5". It is Durafoam at the bottom and Roxul on top of that.
- Trailer with flashing, attachment boards and insulation: $8000
Check out my work progress here: sashastinyhouse.blogspot.com
Also for sale from my project:
- Exterior door custom made at Surrey New and Used. Rough measurements 28" x 81", 2x4 framing. Narrow to fit tiny house dimensions. Metal door, primed white, with narrow vertical window on one side. Opens out. $240
- 3 used vinyl windows in good condition:
1- casement, opening sideways roughly 3' long x 3.5' high. $50
2- awning, roughly 2.5' long x 1.5' high. $30 each
- two new vinyl windows, one horizontal one vert, both roughly 16" x 30". $90 each or both for $150
- 8 sheets of 5/8" plywood, bought new, all primed on one side. $200
- three full bags of Roxul insulation for 2x4 construction, 24" o.c. and some leftovers from the floor insulation. $100
- Durafoam insulation panels. Four 3/4" and three 1.5", and a couple of small pieces. $100
- One small metal bar sink, 15"x 15". $20
- Various IBS plumbing pipes and connectors, mainly 2" and 1.5". $100
- Marinco 50' 125V 30A 10 Gauge 3 Conductor Marine Grade Shore Power Cable, for plugging tiny house to power source. No plug. $50
- Laminated hardwood chopping block to be used as kitchen counter, roughly 70"x40"x1.5". $150
- About 140 square feet of floating cork flooring, beautiful but with some white marks that can be rubbed off. $100
- King-size memory foam thick mattress topper, in a protective bag. $20
- Some nice simple small wood cabinet doors, most with hinges. Free with purchase.
- Heavy duty trailer hitch arm, pin and 2 5/16" ball from Canadian Tire. $90
- Enormous tarp, comes with sale unless unwanted. Big enough to cover the house under construction.
- Two milk crates of mixed metal construction connectors. $75
- Mixed bag of construction materials, free to whoever comes to take anything!
I'm currently storing the trailer, leftover insulation and plywood (under cover and well wrapped with tarps) in Richmond. All the other materials are there as well.
Trailer with flashing, attachment boards and insulation is $8000. Other materials at listed prices. If you would like all together (or most, we could work that out), it would be $9000 (25% savings over buying all materials individually).
If you are interested, please send a message!


Thursday, September 4, 2014
3-D house drawing
Courtesy of Daniel Ortegon, architectural drafter.
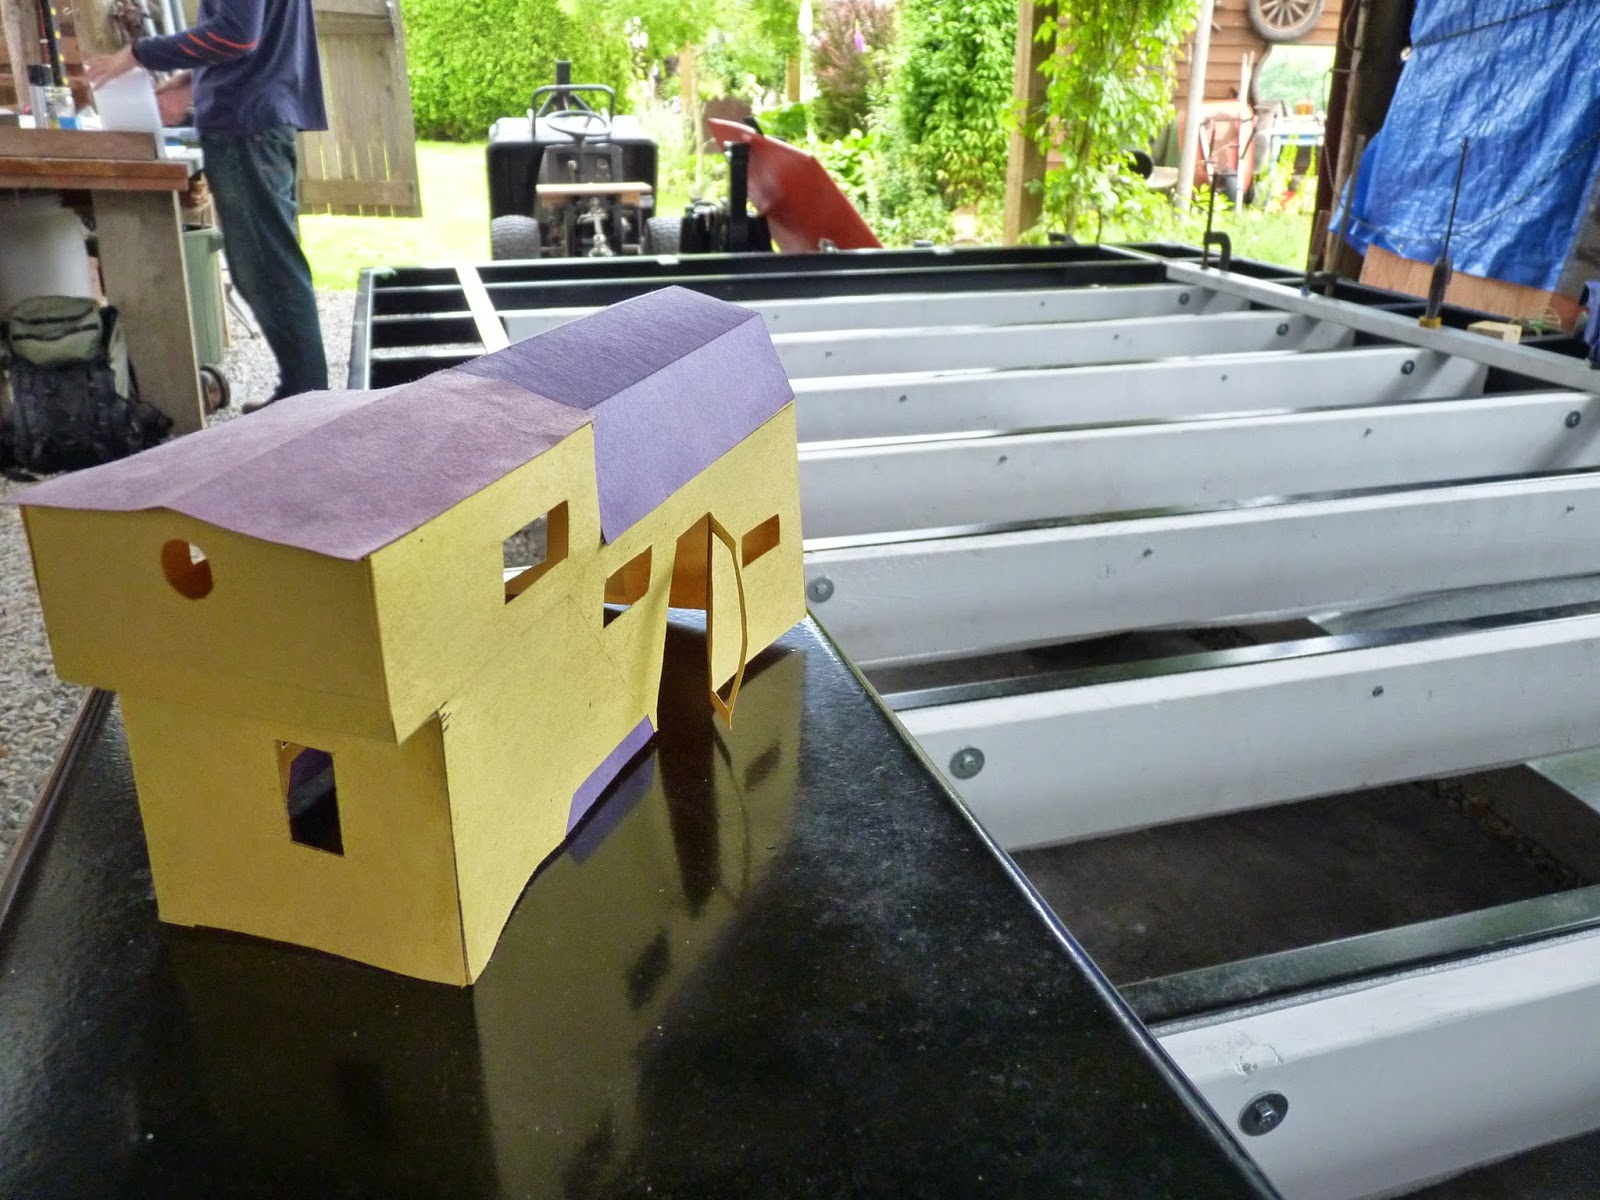
It's very thrilling to see my future house framed in 3-D. So far my visual representation ability has been somewhat limited to 2-D (aside from a paper model I made of my previous design. That was a very good exercise which I highly recommend, suggested to me by an achitect friend.)
It still needs window and chimney openings, will post again with updated drawing. Anyhoo, check this beauty out:
 Awesome! Fun to visualise this becoming a real-life structure.
It's very thrilling to see my future house framed in 3-D. So far my visual representation ability has been somewhat limited to 2-D (aside from a paper model I made of my previous design. That was a very good exercise which I highly recommend, suggested to me by an achitect friend.)
It still needs window and chimney openings, will post again with updated drawing. Anyhoo, check this beauty out:
Monday, August 25, 2014
New Design??!
Woah! Changing horses mid-stream... good thing this stream ain't flowin' that fast. Har.
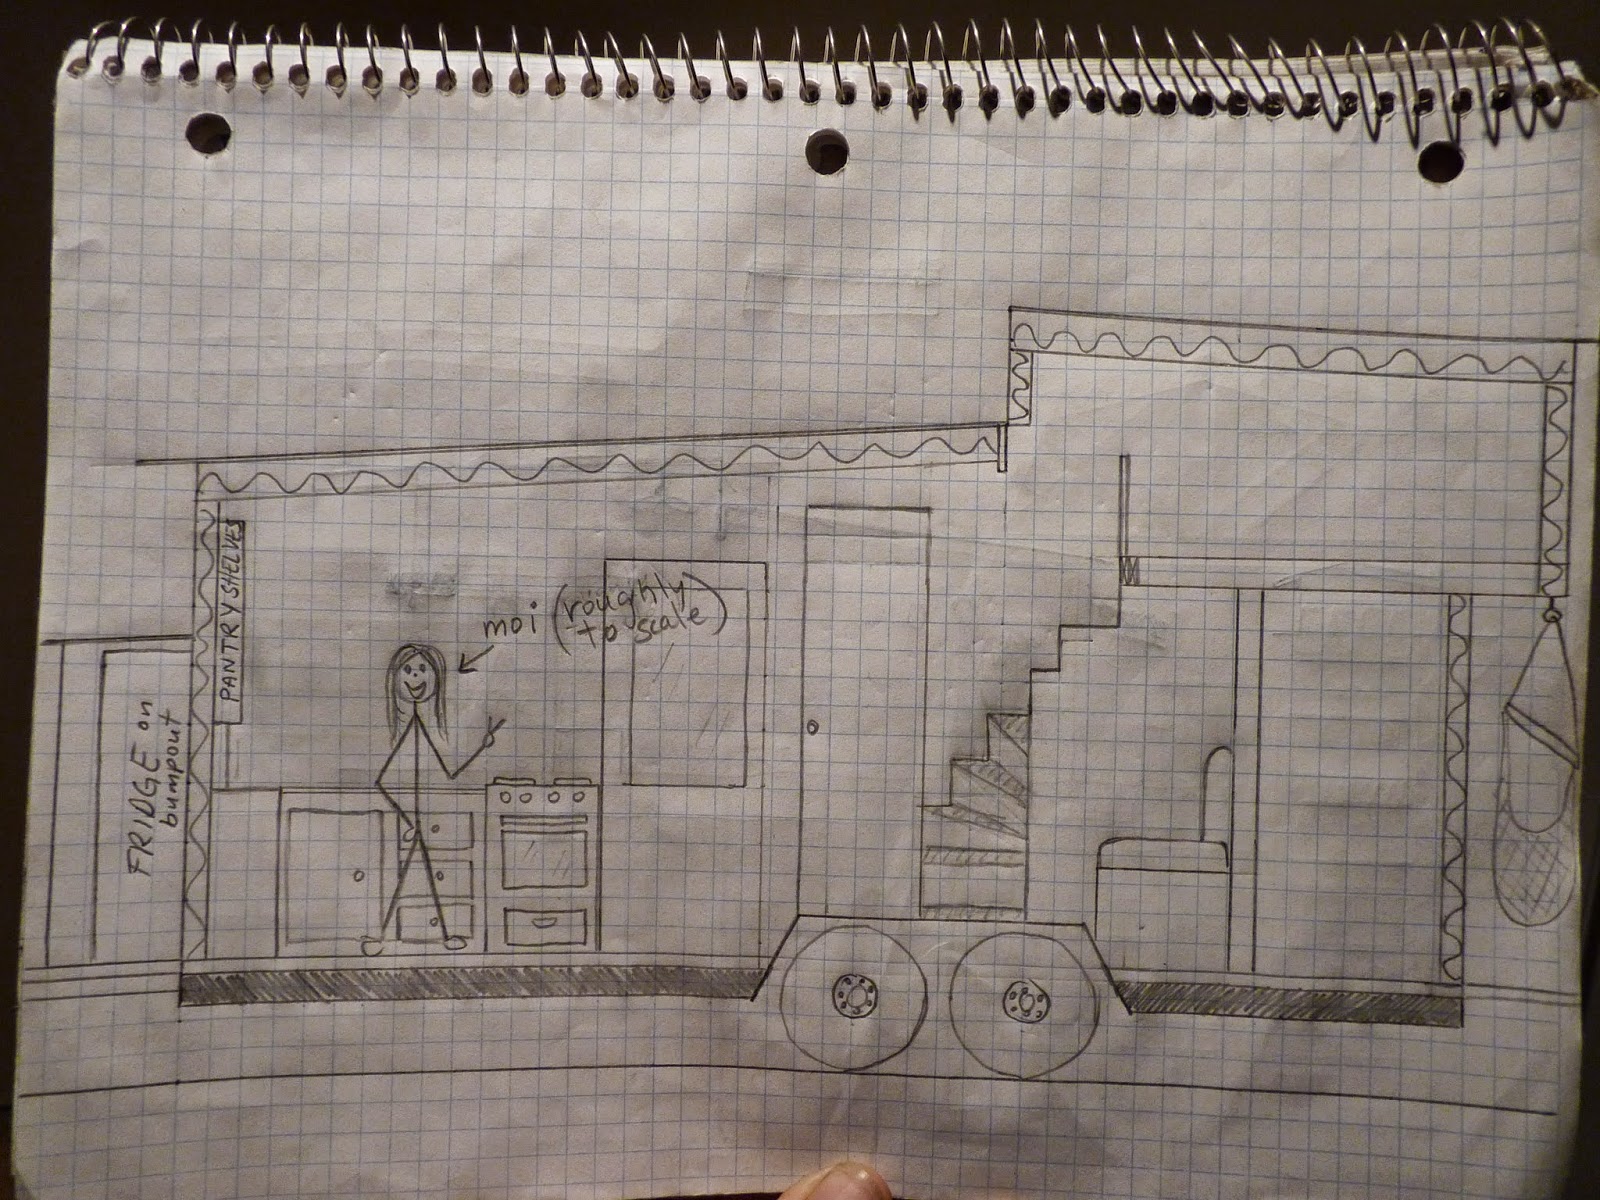
Upon further consideration, I'm now considering... a different roof! Here's my relatively unchanged floorplan:

And a updated profile drawing, with shed roof:
This roof design is heavily inspired by Brett Sutherland from New Zealand's little house: https://www.youtube.com/watch?v=VckbqU4kK2I.
The idea to change is based upon the thinking that my previous roof design (gambrel roof, with low pitch gable roof over loft) is likely heavier, and more complicated to build. Simpler and lighter is just too tempting to pass up. Plus I quite like the modern look this roof gives. Cool house Brett!
Any thoughts are welcome! Thanks!
And yes, that's a hammock hanging from the back of the house :-)
Upon further consideration, I'm now considering... a different roof! Here's my relatively unchanged floorplan:
And a updated profile drawing, with shed roof:
This roof design is heavily inspired by Brett Sutherland from New Zealand's little house: https://www.youtube.com/watch?v=VckbqU4kK2I.
The idea to change is based upon the thinking that my previous roof design (gambrel roof, with low pitch gable roof over loft) is likely heavier, and more complicated to build. Simpler and lighter is just too tempting to pass up. Plus I quite like the modern look this roof gives. Cool house Brett!
Any thoughts are welcome! Thanks!
And yes, that's a hammock hanging from the back of the house :-)
Sunday, August 17, 2014
Insulation station
 |
| floor foam |
I'm insulating the floor now, which is pretty exciting. Mostly in that it's not screwing metal onto other metal. I've been doing a lot of that up till now :-)
Relative to that, insulation is a piece of cake! (More on the cake part later...)
I have to fill a 5" cavity, which is an odd dimention. So, mix n' match. Bottom layer, rigid foam. On top of that, Roxul. Both seem to do okay with moisture, which is why I chose them for the floor. Couldn't get the straight answer on if Roxul contains formaldehyde... I'm keeping it confined to the floor, where it will be fairly well sealed in.
 | ||||||||||||
| caulking |
 |
| patches for holes in flashing |
 |
| roxul |
 And, for good measure, some more metal screwed to metal. This is the front edge of the trailer, where the flashing and frame meet. Butyl caulk in between, and screwed.
  |
| Insucake! |
It's so easy to cut this stuff, and it makes me imagine that I'm cutting a big sponge cake.
Ultra effective and stylish safety gear
 |
| bandita de Roxul |
 |
| sound system |
Monday, July 7, 2014
More cutting, screwing and hanging out under my trailer
My flashing is more or less installed now, which gives the trailer a much different look!

Here I am cutting the sheet metal with electric shears:
It makes fun curly strips of metal!
 Bird's eye view of the trailer with flashing and boards attached to the metal joists
 View of the underside of the flashing. The 1" screws go into the bottoms of the 2x5" boards, which are isolated from the metal by a strip of sill gasket. I will seal the seams with butyl cocking and screws on the overlapping sections (there is a 2" to 4" overlap on all seams)
 Here you can see the depth of the floor cavity, the bolts and screws attaching the boards to the metal joists, the strip of sill gasket, and the flashing under it all.
Next up: insulation! I decided on a 1 1/2" layer of durafoam to go on top of the metal, then fill in the rest of the cavity with 3 1/2" of Roxul. Then I will put a layer of 1" durafoam on top of the whole platform, to isolate the metal joists from the plywood floor decking.
After that... framing. Oh sweet, sweet framing to take me into the realm of the vertical... I so need to go vertical, all this horizontal is getting me down :-D
hehe
Here I am cutting the sheet metal with electric shears:
It makes fun curly strips of metal!
Next up: insulation! I decided on a 1 1/2" layer of durafoam to go on top of the metal, then fill in the rest of the cavity with 3 1/2" of Roxul. Then I will put a layer of 1" durafoam on top of the whole platform, to isolate the metal joists from the plywood floor decking.
After that... framing. Oh sweet, sweet framing to take me into the realm of the vertical... I so need to go vertical, all this horizontal is getting me down :-D
hehe
Tuesday, June 24, 2014
Two steps back equals four steps forward!
Ok, since my last post I've had to do a bit of backtracking. That's not super fun, cause it feels like taking steps back instead of moving forward on the project. But in reality I have been moving forward as the extra steps will be worth it in the long run.
My framer suggested that the bare wood against metal might be prone to rotting over time from condensation on the metal, so I've taken some steps to protect it. I took all of the 2x5s off and covered them with two coats of high quality exterior grade primer. I also attached strips of sill gasket to the wood where it will be in contact with the metal of the trailer frame and with the metal flashing underneath.
 He also suggested that attaching the boards to the trailer with screws alone would not be strong enough over time, what with some vibration from moving the trailer. Even though the boards won't be load bearing, they need to be securely fastened. So I took them off, drilled the existing holes in the boards to accomodate 14" bolts, drilled corresponding holes right through the trailer joists, and have transferred the screws that were in there to the middle of the boards. They're all back on now, and looking snazzy. Just like this guy:
 What an awesome helper. Thanks Carl!
Oh, that metal beam is clamped on there to keep the wood boards from crowing up abover the level of the metal joists while Carl screwed them back on.
Now I'm back to attaching the flashing to the bottom. The first sheet is on, and the second one's ready to go on now too, with cuts made for where the tongue attaches to the main frame.

Feels like I'm moving forward again... :-)
My framer suggested that the bare wood against metal might be prone to rotting over time from condensation on the metal, so I've taken some steps to protect it. I took all of the 2x5s off and covered them with two coats of high quality exterior grade primer. I also attached strips of sill gasket to the wood where it will be in contact with the metal of the trailer frame and with the metal flashing underneath.
Oh, that metal beam is clamped on there to keep the wood boards from crowing up abover the level of the metal joists while Carl screwed them back on.
Now I'm back to attaching the flashing to the bottom. The first sheet is on, and the second one's ready to go on now too, with cuts made for where the tongue attaches to the main frame.
Feels like I'm moving forward again... :-)
Subscribe to:
Posts (Atom)